 RV black tank cleaning…it’s a dirty topic, but SOMEBODY’S gotta talk about it, right?
We have four sets of friends that we normally camp with (not all at the same time). Of those four sets of friends, two of those sets DO NOT use their bathroom for BIG BUSINESS.
So, it begs the question: WHAT TO DO WITH THE POO?!
If you know me personally, you know I’m gonna struggle not cracking a BUNCH of jokes here…I’m going to try really hard to channel my inner adult today…at least while writing this post! This would normally be a place for my inner child to run WILD!
RV BLACK TANK CLEANING TIPS
We’re gonna start from the beginning. One of the first things we did when we pulled up at our first campground on our very first camping trips was to attach and open the black tank valve.
I know, I know…GROSS!!! But we didn’t know any better. You see, there’s this thing called “pyramiding.” You don’t have to be too imaginative to figure out what it means (ESPECIALLY if you’ve ever been near cows!).
Pyramiding occurs when all of the water drains out of the tank and nothing but the solid matter is left. This is NOT GOOD and can become quite smelly in hot, humid climates. How do I know this? We were in Dauphin Island, Alabama when this occured!
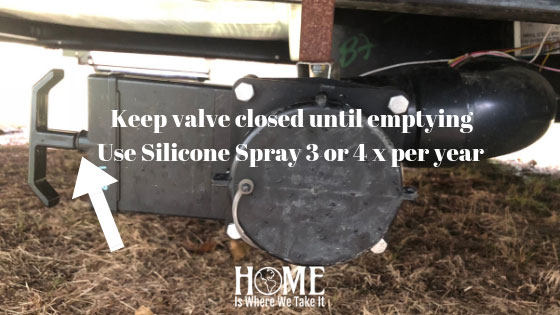
RULE 1: KEEP THE BLACK TANK VALVE CLOSED UNTIL EMPTYING
Keeping the tank valve closed is a great practice and actually makes RV black tank cleaning MUCH easier when it’s time to clean the tank.
Keeping the valve closed also allows the water in the tank to build up, therefore, allowing the chemicals to break down any solid matter that enters the tank.
Another thing water accumulation does is that it keeps the seals lubricated, which is important, I hear! 🙂
The only exception to this rule is if your gray tank drains from the same port as the black tank. It’s ok to leave the gray tank open while camping, but remember to close it a day or two before breaking down camp. You’ll want the extra water to rinse the waste hose.
RULE 2: ADD CHEMICALS AFTER DRAINING THE TANK
Whether you’re on the natural side of the camp, or the chemical side of the camp, the right time to put in additives is right after cleaning it out. We do this even when packing up and leaving camp. I’ve read that it’s best to keep a little bit of water in the tank at all times, so we always try to put a gallon or so in it after cleaning.
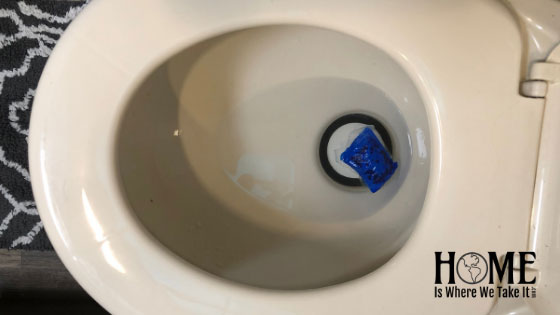
We use the Walex Porta-Pak drop-in tabs. I actually use these in both my black tank AND my gray tank. I like the way they smell, and the packaging says it’s natural enzymes that break down waste and paper. It also naturally lubes the seals and is safe for septic systems.
Walex also offers a Bio-Pak which is supposed to be strong enough to break down non-RV grade toilet paper. You go ahead and test that theory if you want…write me and let me know if you do! I ain’t gonna do it! Wouldn’t be prudent!
I would, however, use the Bio-Pak…just with RV safe toilet paper. It might be a nice change of scent around the holidays with their lovely Alpine Fresh Scent! LOL!
My friend Julie Chickery at Chickery’s Travels likes to use another method of Calgon and dish detergent (1:2 ratio or 1/2 cup Calgon to 1 cup dish detergent). In fact, they have a fun video on this subject on their YouTube channel.
RULE 3: KEEP FLUID IN THE TANK
Ok, so I mentioned earlier that we like to keep a little bit of water in both tanks. We do this after emptying and rinsing the tanks, and usually at the same time as adding our Porta-Pak tabs. I fill the toilet with some water and drop in a tab. Once the gelatin packaging dissolves, I flush it down.
To add a tab to the gray tank, I usually dissolve a tab in a cup full of warm water, then pour it down the sink. We only do the one in the gray tank about once every other time we empty it unless it’s the heat of summer.
Once we’ve flushed the tab in the toilet, we usually will fill and flush one or two more times to be sure and have about a gallon or so of water in the black tank. The theory is that this water will slosh around and clean the tank as we travel.
We don’t want too much water in it because water is heavy and decreases our gas mileage. We normally only carry enough fresh water with us to flush if we’re on a long trip for emergency bathroom stops!
RULE 4: RINSE THE BLACK TANK BEFORE LEAVING YOUR CAMPSITE
Ok, this is where it’s DEFINITELY nice to have a bigger rig. Bigger RVs have an RV black tank cleaning system. Most modern Class As, Cs, Fifth Wheels, and larger Travel Trailers will have a tank flush system.
This is where I will cleverly refer you to your owner’s manual or YouTube to learn how to use your particular system. Mine is a much simpler system since we have a small travel trailer. I have no experience with using your fancy systems!!! :O
We have been known to just fill the tank two to three times (which is pretty much a universal process regardless of your rig) and empty the tank until the water exiting the tank runs clear.
Recently, we bought a Camco Swivel Stick to clean the poop-chute from the top down. We’ve had a problem with our full tank warning light staying on constantly and needed to fix that! This stick attaches to a water hose, has a shut-off valve, and a swivel head as the name implies.
The swiveling head allows for you to reach down inside your tank from the flush flap in the potty all the way down to the tank itself. This rinses the sensor and everything else on the way down.
To do this, I unhook the water supply from the camper and turn off the fresh water pump if it happens to be on. The only water entering the camper should be coming from your swivel stick hose. This allows you to keep your toilet flap open while you’re working.
I have recently (and by recently, I mean TODAY) become aware of the Camco Holding Tank Rinser. Since this camping season is almost over, I will most likely wait until our next camping season to get it. Then again, I may get one now so I’ll have it on hand when we start camping again in February or March.
OTHER MAINTENANCE TIPS
Aside from these tips for camping season, here are a few things to think about for off-season.
- Consider adding RV SAFE ANTI FREEZE if you store your camper for winter. I don’t think a little water would hurt anything, but if you’re in a super cold climate, I’d definitely look into this. It’s DEFINITELY worth reading your owner’s manual!
- Use silicone spray on the release lever under the camper to keep it from sticking. I didn’t even know this was a thing until reading recently. It’s suggested to do it several times per year.
- A word about exhaust fans – pay attention to where yours is in relation to your vent pipe on your RV roof. Our exhaust fan is right next to our vent pipe. By having the fan on when we flush, we are sucking in the fumes we are trying to remove!
RECAP:
Just in case any of this was unclear, let’s recap. This is how we deal with our RV black tank cleaning:
- Attach sewer hose (AKA: The Stinky Slinky) to waste holding tanks upon camp setup, but LEAVE SHUT until it’s full – unless you leave your gray tank drain open, this is ok behavior.
- Close gray tank a day or two before leaving the campgrounds so as to save enough water to rinse the hose after the black tank cleaning process.
- Empty black tank first, then rinse per your manufacturer’s instructions until the water exiting the tank runs clear.
- Empty the gray water tank and rinse if necessary.
- Add tank chemicals and a small amount of water.
That’s all I’ve got for now! I should get a gold star for behaving!!! 🙂
If you’d like to read a list of things you need before camping, check out this post. You can also check out my list of “luxury items” you’ll probably want when camping.
Do you have anything you would add my RV black tank cleaning? I’d love to hear what you have to say! Let me know in the comments!







Great article! Thanks for sharing the video too!
Thanks…and you’re welcome! I loved the video! It was super helpful for me since I don’t have that kind of system. I knew my readers would love it, too!
Very good job behaving. Very useful and well explained information. Luckily, I knew most of these things. My wife insisted I read this. Thank you for reconfirming.
I love your wife already! She’s my new BFF!!! It never hurts to read another blog post about black tanks…thanks for reading, and for commenting!
Very good info. One thing I do dumping the tanks. I have a dump valve on the outlet just before the hose. I open this valve and then the black tank valve. When empty I close the outlet valve and open the gray tank valve while the black tank valve is closed. This floods gary water into the black tank. I then close the Gray valve and open the mail valve. Thus flushing the black tank out. You do this maybe twice. Then I open all the valves to empty both. Then I start a clean water flush. Only a little more work but I feel it is forth it.
Thanks again for great information.
Doug
Hey Doug! I’ve been out of the loop for a while…major news coming soon! Anyway, thanks for the tip! My tanks are separate, so this is a no-go for me, but maybe someone else will find it useful! Thanks again!!!
Good Info. Here is what we do….on moving day, right before we hit the road, we dump all the ice from our fridge down the toilet. We add one dishwasher detergent pod and about a liter of water. The ice cubes help break up any build-up we may have in the tank. The movement of the rig while we are driving moves the ice around for a good cleaning. 🙂